Starting from the left-hand menu (Website-Recommendations>) you can access the recommendation blocks.
On this page you will find a first “macro subdivision” by type of page.
By type of page we mean the models usually characterizing an internet portal.
In particular, we find:
- HOME
- CATEGORY PAGE
- PRODUCT DETAIL PAGE
- CART PAGE
- SEARCH PAGE
- LANDING PAGE
- OUT OF STOCK AND 404-PAGES
- OTHER PAGES
- USER REGISTRATION
- CHECKOUT PAGES
For each of these types of pages, it is possible to insert one or more recommendation blocks characterized by multiple logics.
Let’s take the “home page” type of page, for example.
On the home page it will be possible to insert one or more blocks. Each block has a location and logic that we’ll see how to configure shortly.
To access the configuration, click the contextual configuration button on the right.

As you can see, multiple configuration steps are offered, let’s see them below in detail.
Configure
By accessing the configure screen, it will be possible to choose the basic settings of the block

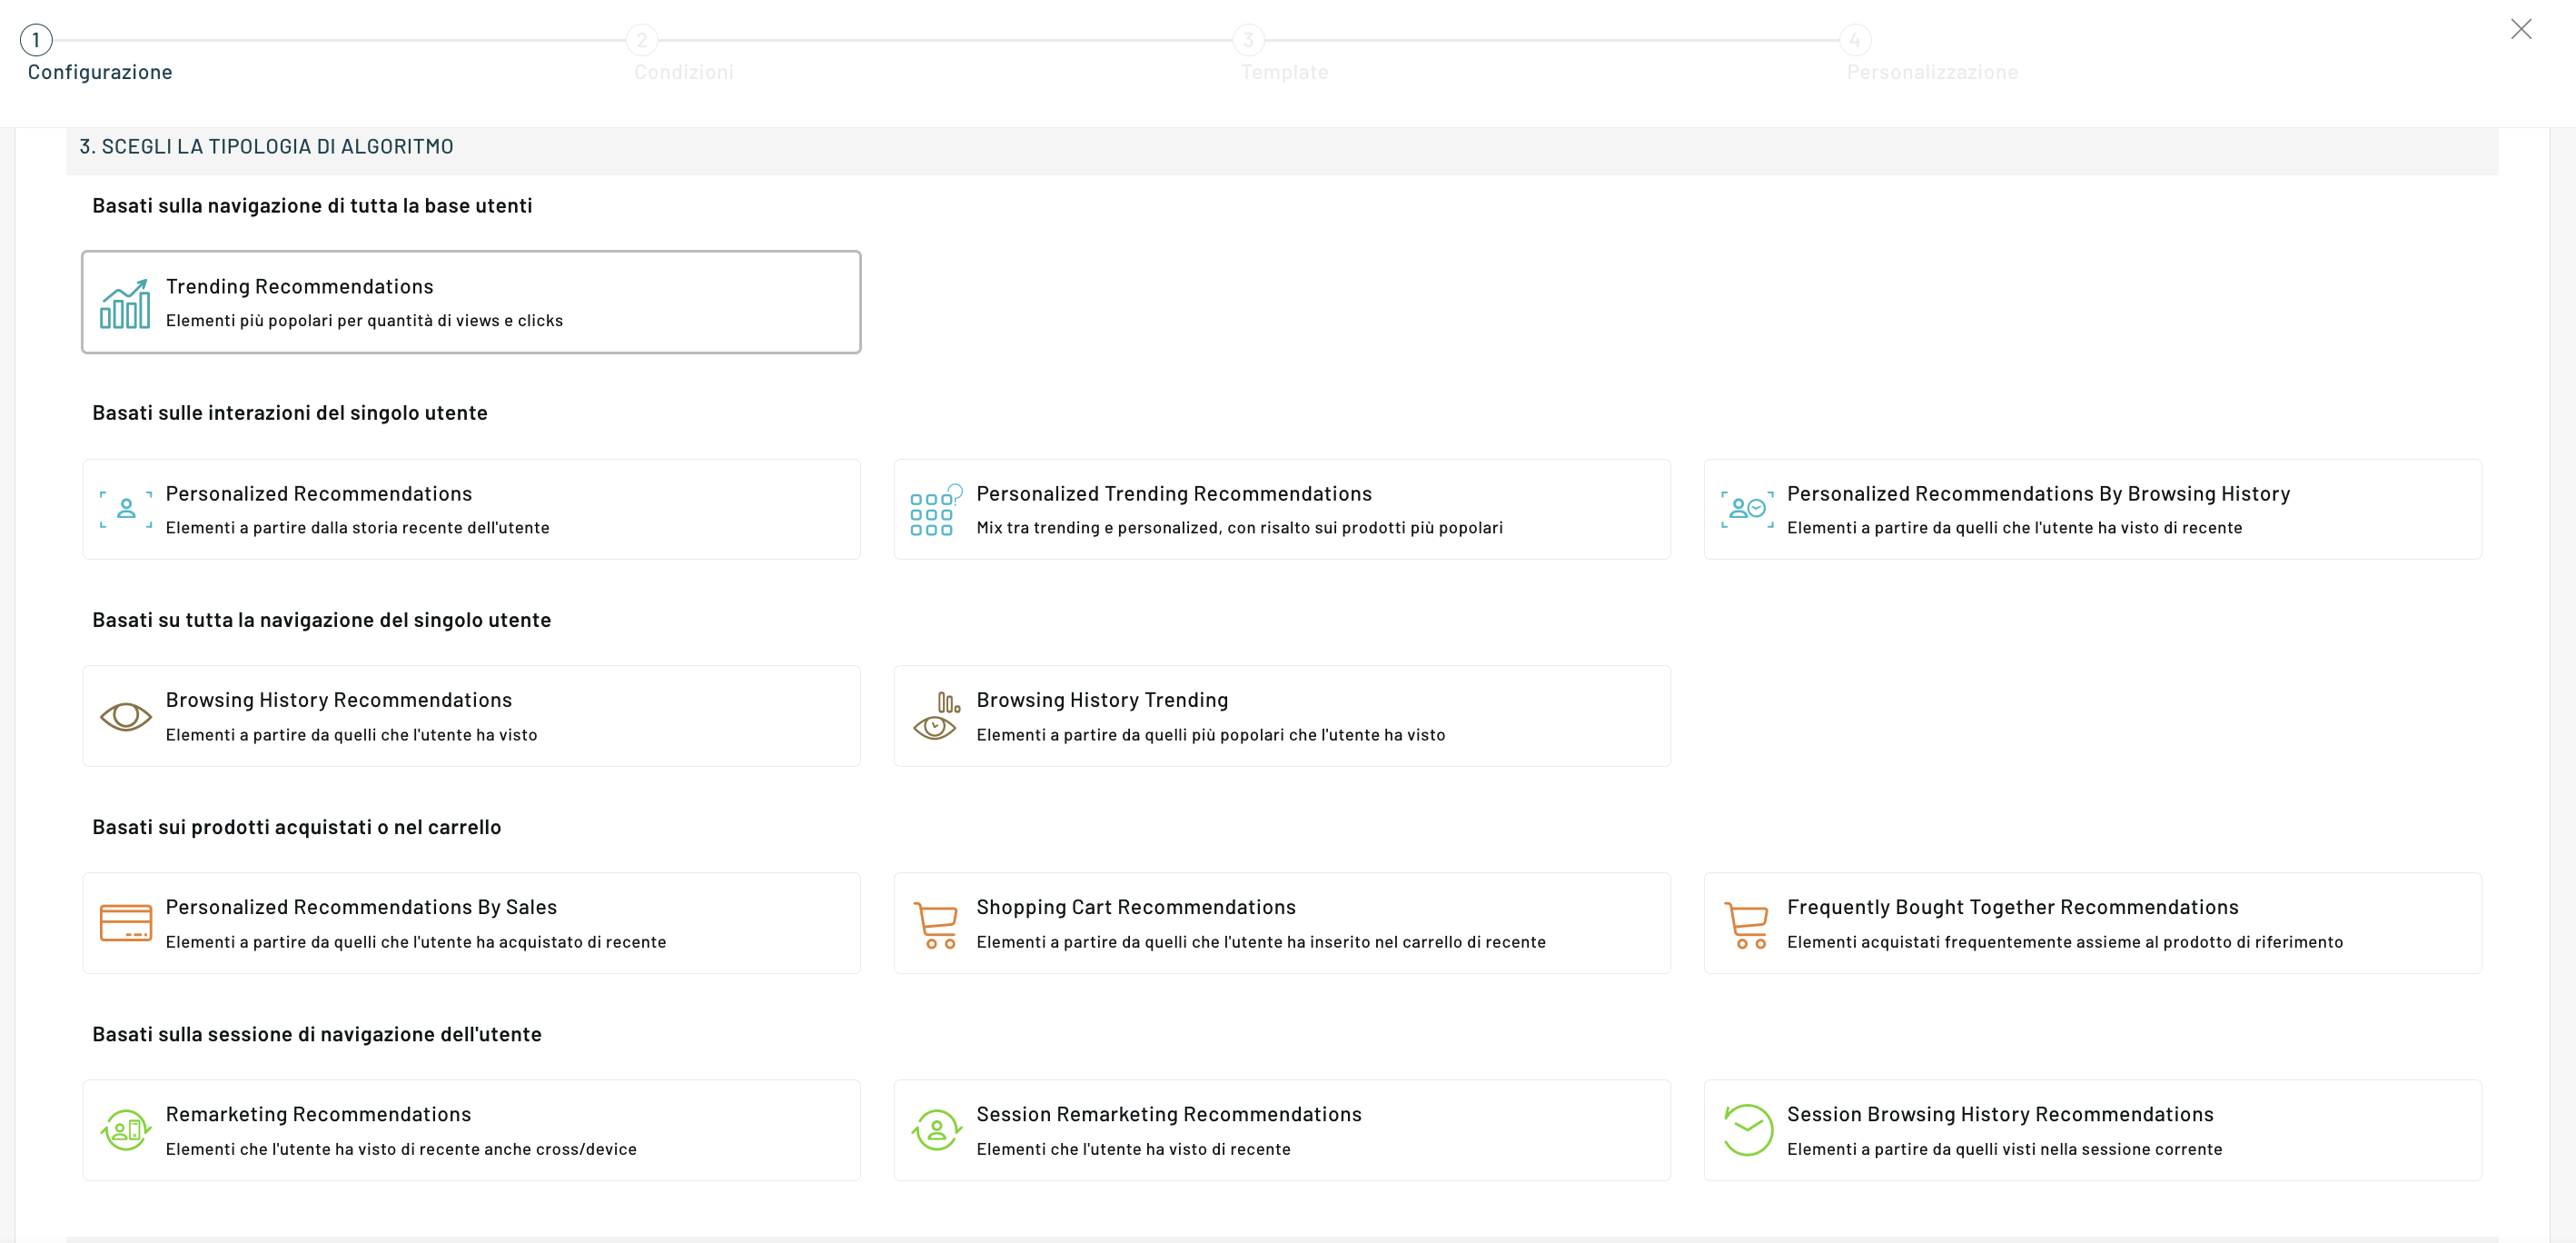
Algorithm Type
In particular, it is possible to choose the logic with which Blendee’s artificial intelligence algorithm will analyze the data of the current user in order to offer him the most interesting products/content for him. For a complete list of available algorithms, please visit the page Types Of Recommendation – Glossary where you can find the definition of the logical specifications that Blendee proposes.
Once you have selected the type of algorithm to use, you proceed to fill in the fields, such as Name, Content Type for recommendation, with which you can select whether product or content, Segment and many others.
Position
The location (expressed by an xPath) indicates the exact point where we want our block to appear. The xPath technology used by Blendee allows you to insert our block without having to intervene in any way within your website.
How to derive the xPath of the desired location?
To get the xPath of a location, you just need to use a browser such as Google Chrome or Firefox that are clearly equipped with plagiarism for developers.
Let’s take an example using the Google Chrome browser:
Log in to your website on the home page or page you’re setting up.
Once you have identified the point of your interest, click on it by pressing the right mouse button and select “inspect“.
Once this is done, a source code analysis console will appear (usually at the bottom) that will highlight the area of your interest.

At this point you will have to right-click on the selected code within the inspector. A new context menu will appear; inside you will have to choose “Copy” -> “Copy xPath”.

At this time your xPath code has been selected and copied to the clipboard of your device.
You will now have to go back to the my.blendee console and paste (Cmd+v/Ctrl+v) the xpath you just copied into the xPath field. The xPath code comes with a syntax similar to this: //*[@id=”div_msg_static”] and represents an absolute position within your website.
You can now choose where to place the block relative to the selected xPath. Here you are asked to choose between “before”, “after” or “replace”.
- First: it will insert the product recommendation block earlier (aesthetically from top to bottom) than the position (xPath) you have chosen.
- After: it will insert the product recommendation block after (aesthetically from top to bottom) with respect to the position (xPath) you have chosen.
- Replace: Insert the product recommendation block in place of the block in the position (xPath) of your choice.
To complete the general configuration we still need to enter some parameters.
In particular: the minimum and maximum number of elements that the Blendee intelligence algorithm will have to select.
Finally, the template to be used. For a more detailed guide on how to use templates, please visit: Recommendation templates
The toggle button will be used to turn on or off the custom block within your website.
Customize
The second necessary (although not mandatory) step to complete the publication of the recommendation is to complete the insertion of the customization parameters.
To access customization, navigate back to the context setup menu and choose Customize.
The characteristic of this interface is that it is completely dynamic. This means that you will always find a set of customizable fields and parameters, linked to the context in which you are.
On the page of our guide dedicated to templates you can view the available templates with their characteristics and open the corresponding detailed article with the various functionalities and configurable keys.
If you are going to use the pre-existing basic templates you will find all the properties available. In the case of custom templates, you will find a minimum set of properties at your disposal.
Within this interface, on the left side (on a blue background), the information relating to the type of field that is managed (in this case, the type of data for example) is presented at the same time.
By managing these customization parameters, you can modify the behavior and appearance of the block to your liking.
For completeness, see also the guide to the use of mandatory/suggested filters.
Thanks for contributing!